Yum – Raw Granola

A few days ago my wife and I attended an all day meditation class. We were asked to bring something to share during the lunch break. I knew that I wouldn’t have the time just before class to prepare anything, so I kind of put the idea of bringing something out of my mind and tried to neglect it. My wife didn’t. She suggested that we bring some granola that I’d make a couple days earlier. Her thinking was that it was done, raw, I could make more AND it tasted great. I agreed and didn’t think much more about it.

During the lunch, I was glad to see that multiple people picked it up and gave it a try. Turns out that the bowl was emptied quite quickly. A number of people sought out the chief (me) in order to figure out what was in it and they politely share their application. It’s not often that I go somewhere with my wife and not see everyone praising her over one of her fabulous concoctions!

Originally, I mentioned for the folks to just connect to this blog and search for granola. The search in the upper right hand side works really well at finding keywords and the article would simple come up. If you go and do that, you’ll find that the old granola article that I posted referenced a recipe that is no longer on the web! Dang. The old site that has been down for a while now and the folks that ran it seemed to have disappeared somewhere east of the rockies. Looks like the original recipe is gone for good.

So, from memory, here it is. Note that I make it different each time so the ratios really depend on what you have available to you when you start mixing. The one key ingredient, ground cinnamon powder, you’ve got to have that.

IMG_9456_ingredients

  • 1-2 cups raw hulled sunflower seeds soaked overnight
  • 1 (or more) cup raw hulled pumpkin seeds soaked overnight
  • 1 cup raisins soaked overnight
  • ½ cup dried apricots soaked overnight
  • 1 cup almonds soaked overnight
  • 1 cup pecans soaked overnight
  • 2 apples
  • 1 heaping spoon full ground cinnamon powder
  • ½ ripe pineapple (optional)
  • ¼ to ½ cup maple syrup

You’ll also need a food processor and dehydrator.

Step 1, soak the nuts and seeds! Give them time to rehydrate and start growing. With the nuts, soak for 6-8 hours and then rinse them off good. With the seeds, do the same but also let them grow for a while. Say, overnight. Make sure to rinse them good before using them for the granola. Also, soak the raisins and apricots. Yet, with the raisins and apricots, rinse them a few times before soaking them. You want to get any residue off the fruit before letting it hydrate. When we use this fruit, we’re also going to use the water that it’s soaking in. When you soak fruit, the water picks up a lot of the sugar. Since we’ll be removing the water in the dehydrator, there is no need to drain out that extra sugar!

IMG_9460_bowl

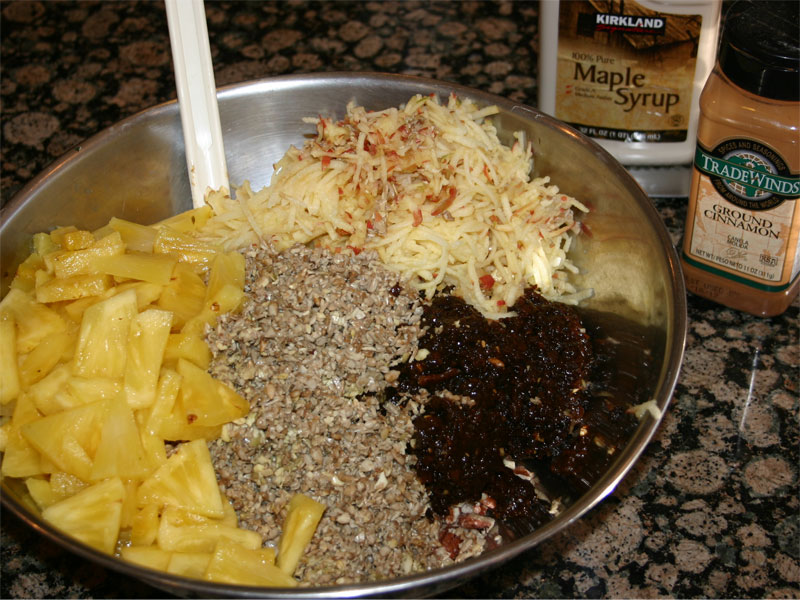
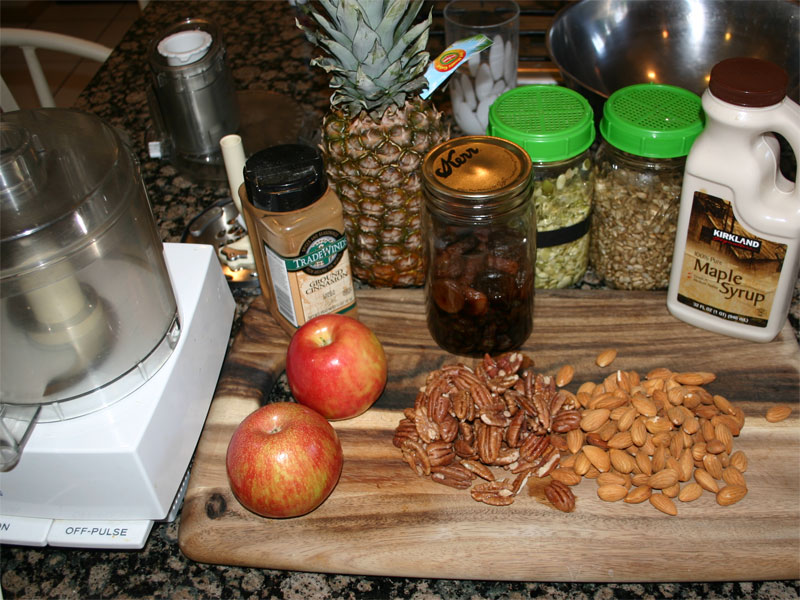
As you can see in the above picture, I’ve run each main ingredient through the food processor. I pulsed each one and then poured it into the bowl. Each time, I made sure that there was some texture left with the particular ingredient. I don’t really like large chunks, so if you were to look at the almonds and pecans, you’d see that the biggest pieces are about ¼ to ½ the nut.

When it came to the apples, I cored them and ran them through the grader option. With the raisins and apricots, I mixed it until it was paste. The fruit is the glue that holds everything together.

When I added the pineapple this time, I wanted that chewy fruity feel so I cut it down to pie shaped pieces knowing that the dehydrator will take it down the rest of the way.

Step 2, mix it all together. Get everything evenly distributed and then add a large heaping spoon full of ground cinnamon powder and the maple syrup. Mix it more until the herb is spread evenly.

IMG_9462_sheets

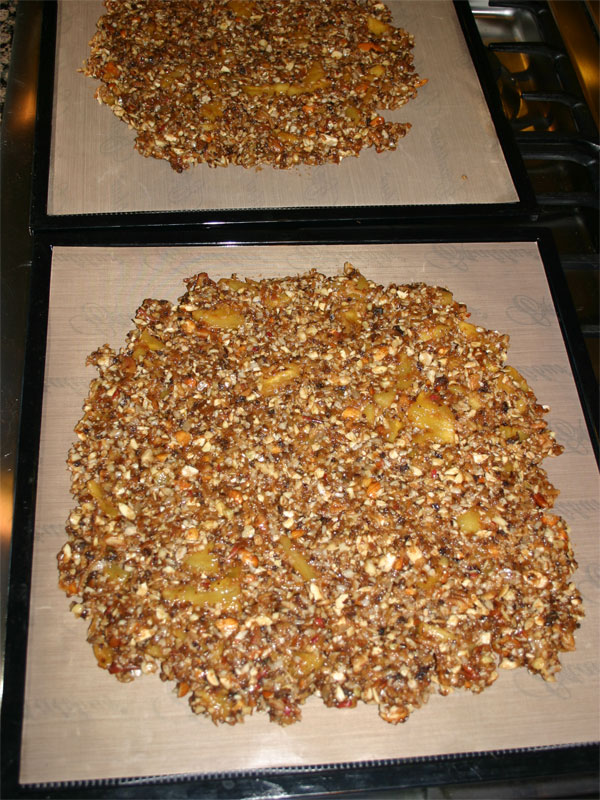
I like sheets of granola, thus I spread this large bowl out on four dehydrator sheets. Notice that I pressed it down to the width of the pineapple chunks.

Step 3, dehydrate overnight or maybe a bit longer.

IMG_9465_finished

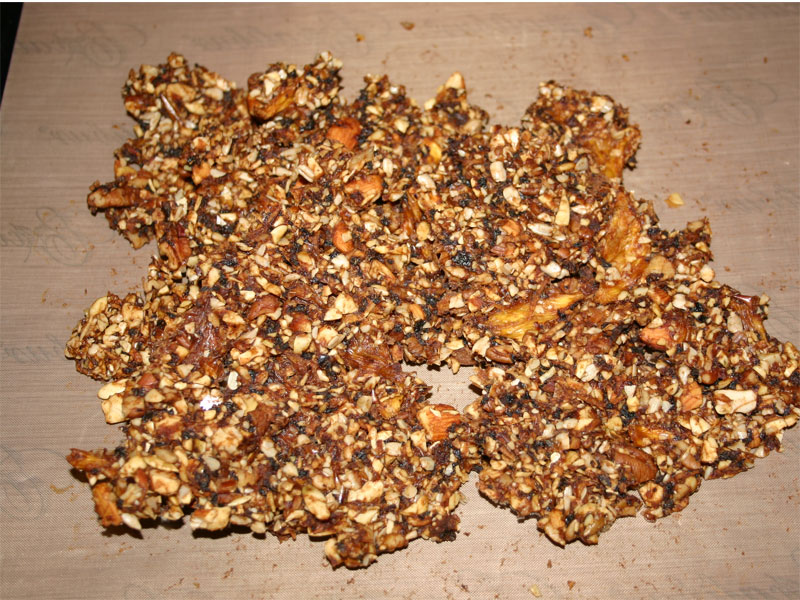
You can peel it off and eat at any point, I like it when it’s still bendable but breaks apart if bent too far. This is usually 24 hours at 115 degrees.

When it’s done, you can’t tell there was ever any apple added. You’ll see the dark raisin and nut pieces, but everything else just kind of blends in like cereal.

Oh, most people think of this as candy! With all the fruit, it’s really sweet. I treat it like candy too. In a way, it’s like peanut brittle. The last picture doesn’t really show it, but in order to store it in an airtight zip lock bag, I fold the sheets over and over again until the pieces are 2-3 inches in size. Thus, each time I go for a snack, I get a cookie size piece to enjoy!

Note that the real trick here is the ground cinnamon powder. It’s just not the same without it!


Buying Wheatgrass in the Puget Sound area

I’m totally excited to have found a supplier for wheatgrass in my neighborhood! The supplier is Indianola Organics located in Indianola, WA. Just south of Kingston. They have a website, indianolaorganics.com, so you can see all the items they offer (not much) but it does include the equipment that goes with making the juice. When I talked to Teresa (I guess you could call her the wheatgrass lady), she mentioned that the best way to get the product was to order it on farmstr.

Wow, farmstr.com! What another great resource! Here is a site that brings together small farmers and consumers like myself. The concept here is that the small farmer delivers to known locations once, twice or more, times a week and the customers come pick up the merchandise. For wheatgrass, she just drops it off with your name on it and, within a few hours, you pick it up. It’s really pretty simple.

Note that the bottom of the farmstr page has a link to the pickup locations. Check to see if your city in on the list. Issaquah is not far from here.

It’s a small world! It turns out that the Redmond pickup location, KIS Farm is owned by a wonderful lady that attends my Wednesday morning yoga class. I got the best tomatoes and Pellegrini Bean starts there! If you haven’t had Pellegrini beans yet, you’re missing the best green (well yellow) beans that grow in the Puget Sound area! Nothing else compares.

Back to the Wheatgrass. A friend ordered up a few flats of which we juiced some together. This stuff was much better than the grass I’d been growing. It’s sweet and rich in flavor; genuinely smooth on the pallet. The price is totally reasonable too!

Ok, to sum things up.

Buy Wheatgrass from IndianolaOrganics via Farmstr and if you pickup at the KIS Farm, take a look around and maybe pick up some dirt! They sell the best topsoil this side of the Cascades.

One last thing. If you haven’t read Why Suffer by Ann Wigmore, it’s a great simple read. In just a few short hours you can learn a significant part of the back story of wheatgrass!

Green day!

Dandelion Root Powder

A number of months ago, I came across an article about an old man that used dandelion root powder to treat his cancerous prostate back to health. A copy of that article can be found one Rense.com here. The article seemed reasonable and I read it a number of times to see if I could find discrediting discrepancies. Well, I couldn’t.

Generally, I have an eye for filtering out articles that are just fluff or misleading propaganda, but this article has a recipe for making the powder that rings true with what I’ve studied and what I’ve already proven to myself to be the truth.

I would encourage you to go read the article. If the article is no longer on Rense.com (as linked to above) just Google up “dandelion root powder prostate cure” and it will most likely be one of the top hits.

Back to the recipe; I’ve cut the important parts from the article and quoted them here:

To make the powder from the dandelion root you must follow my directions to the letter. Any changes and it won’t work. Dig a handful of dandelion roots any time of the year, it doesn’t matter. Cut the leaves off just below the crown. DO NOT WASH. Then they must be dried around 100 degrees. I do it in an incubator with no water. You can also dry them under a heat light bulb if you raise or lower it so it’s 100 degrees. You can also use the sun or put them in the attic if it’s not too hot. It takes about 5 or 6 days in the incubator. I have not done this all the way under the heat light. When you break a root and it snaps it is ready to powder. Take an old iron frying pan and a clean hammer. Take one root at a time and place in the frying pan and start tapping. Don’t hit hard or it will fly all over the place. I put my hand around the root to keep most of it in the pan. If it sticks to the hammer and pan, and doesn’t crumble in your fingers, it isn’t dry enough. Keep it up until you have enough to start. It takes about 20 minutes to ? hour to prepare enough for a week. When you get used to it you can go much faster.

I have an old vessel that druggists used to pound pills, this goes much faster. DO NOT USE AN ELECTRIC GRINDER, it won’t work if you do. You lose too much of the good part in dust. You must do it as I have said or don’t do it at all. I’ve tried shortcuts, but it seems someone was looking over my shoulder, and I know when I made a mistake. I’m just an old farmer and not a scientist, so I wouldn’t know the correct amount to take on my own. Now take a little over one half teaspoon once a day at any time and mix it with water, orange juice, etc.. Do not use in soft drinks, liquor, or anything hot. When mixed, use it all. Don’t let it stand around. Keep the power in a dry place. After taking it three or four days, you will feel good, but nothing else. That is because your blood is building up. When you blood is happy, you’re happy. In most cases, this will build your immune system in from three days to three weeks to the point it takes back control of cancer cells and thus the cancer stops spreading. In most cases it is going to help. There is no body feeling as it works. You just feel a little better each week. After three weeks most of the pain will be gone in your back and you know it’s working if you had pain there like I did. If you have bone cancer in the spine, it will take three months to work. This is not an overnight cure. It took a while to get in this condition and it will take a while for your body to heal. The sooner you start, the quicker you will be over cancer. Young people heal faster than old people, but it will help at any age. I know because I’m 80 and have been taking it for over three years.

Going back to not washing the roots and leaving a little soil on them, it is for your own good. A good bit of immunity comes from the soil, it starts as soon as you are born. Your fingers touch something, and you put them in your mouth. A little dirt at first, and more as you grow older and start crawling. Then everything you touch goes in the mouth. When children go outside to play and when they come in, they are the dirtiest around the mouth and hand. The hands go in their mouths no matter how dirty they are. Many diseases and bacteria live in the ground, but they don’t seem to cause any trouble but it does build up the immune system. Some animals can’t live if they can’t eat a certain amount of soil. If you read this article over, you will see it! all goes back to common sense. I wish all of you people with cancer and other problems the best.

Things that stand out as key are:

  • Do not heat
  • Do not wash
  • Do not mix with bad foods

Because I like to do projects like this, I set out to create some powder that I could experience on my own. The only difference was that instead of using the tools that he mentions, I would use my own but still honor the principle that the medicinal properties are heat sensitive and water soluble – thus no heating and no washing.

Last week I visited a friend’s place where I’d seen beautiful dandelions earlier this spring. She doesn’t use chemicals on her plants and honors the spirit of the land. I figured this would be a perfect place to dig. The tool that I used was a pick-axe. When you dig a dandelion root, the pointy part of the pick will allow you to soften the ground so you can easily pull the weed and get a large section of the root. Using this technique, I dug a 1 gallon pale full of dandelions (tops and roots). The only cleaning that I did was to tap the root on the handle of the pick in order to get most the dirt off.

When I got home, I clipped the leaves off just down to the crown of the plant. I didn’t take clear of the tops like I should have, but if I’d spent more effort to keep them clean I could have made juice from them. I’ll take better care next time. After clipping, I also tapped them again to see if I could get more dirt off them before putting them in the dehydrator.

I set the dehydrator at 105 degrees knowing that enzymes break down when you heat vegetables above about 118 degrees. The original recipe calls for 100.

Five days later, I set to work cleaning the wood hard roots.

cleaningRoot  

As expected, each root shriveled down to next to nothing and after brushing the bulk of the remaining dirt, I had a plate full of roots.

allroots

Here is where my process differed slightly from the old farmer’s technique. I used a Vitamix to ground up the roots to something that could then be ground further with a mortar and pestle.

grinding

If you grind anything too long in a Vitamix, you’ll heat it up. Thus, you have to be careful to remove the flour from the chunks. The flour will heat up quickly if not removed. Notice in the picture (above) that I’ve got a sifting screen. I placed some of the roots in the blender and ground for a few seconds. I then waited for the dust to settle in the blender and I sifted the chunks from the flour. You can see that on the paper towel.

Next, I spent over an hour hand grinding the fine chunks down into a powder. Note that when hand grinding the product will heat up. Any time you apply force to break something down, it generates a little heat. To help mitigate this, I would grind for a while and let it cool. This worked well because it’s tough work! I needed to rest on a regular basis.

powder

When I dug the small bucket of dandelions, I thought that I wouldn’t get much product. Well, as it turns out, I got nearly two cups! This is way more than I was expecting. Next time, I’ll be a bit more selective with the plants and reduce the quantity. I’d rather have fresh powder than year old stuff.

To see if I’d reduced it down correctly, I put a teaspoon worth in a small amount of water, stirred it until it was absorbed and gulped it down. There were still chunks that were big enough to chew – which I would guess would be ok, but the bulk was fine enough to swallow without worry. After rinsing and chasing it with what was left on the edge of the glass, I noticed that there was a few grains of dirt in the bottom of the glass.

Dirt. Yum.

At this point, I packed a few jell caps with the powder. I measured the quantity and 2 -3 jell caps add up to ½ teaspoon.

Now the fun part will be to include this in my diet in some useful way. If it really does improve the immune system, well, I’ll look to see if I get a cold this fall.

Anyone want some dandelion powder?

Good Day!


More good words about dandelion root powder.

http://www.cancerdefeated.com/this-weed-everybody-hates-could-cure-cancer/2029/

Another link that talks about it, but no testimonial.

http://institutefornaturalhealing.com/2013/10/its-a-weed-right-no-its-a-cancer-fighting-superfood/

Champagne Mango with Strawberry Sorbet

Hi All. Found something new to share. Another mango treat! It’s creamy, sweet, has a bit of a chewy texture and its cold! Did I mention that it tastes amazing? It’s totally worth the couple minutes to put it together.

I’ve made this a couple times now and find that I like it better with Almond milk rather than the coconut milk that I show in the picture below. Even though you only put in a splash, it still affects the flavor slightly. Either way, it’s still amazing! 1 serving should easily be enough for two people – as long as you’re not making it for dinner.

Oh! There’s one secret ingredient in this recipe. It’s the honey. This jar of honey I picked up at the Saturday market in LA a number of months ago and its mango infused. Basically, it has mango extract in it. The flavor is pretty strong so I don’t use the honey much. But in this case, I think I’ve found the perfect usage for it! It might even be this honey! I have to say that it really brings out the flavor of this desert.

Ingredients:

IMG_9080_ingredients

  • 1 Ripe Champagne mango
  • 2 Medjool dates
  • 6-7 frozen strawberries
  • 2 Tablespoons almond milk (which is better than coconut milk)
  • 1 Tablespoon Kefir (strawberry flavor)
  • 1 spoonful Honey

Place everything but seeds in the blender and quickly grind it soft. If you blend too long, you’ll melt the strawberries too much. You also want to keep the dates just a little junky so that it gives the desert a little texture.

Note: I doubled the batch – which is what you see in the picture.

IMG_9082_preblend

Notice that I’ve got the soft stuff on the bottom.

IMG_9084_blender

I might have blended just a bit too long. It should stand up a little better than this.

IMG_9087_finished

But look at that end result! Yum. You’ll get a little grit form the strawberry seeds, but the date bits totally make up for it.

This is a melt in your mouth treat. Can’t wait to pick up some more mangos!

Raw Cacao Fruit Balls

It’s been a while, but I’ve found another recipe that’s once again worth sharing. I’ve seen versions of this one on different videos and blogs over the years, but I’ve never really gotten around to reproducing them or playing with the flavors. That is, I’ve always tried to over complicate the treat by trying to make it more like a conventional truffle. Well, it doesn’t have to be complicated. In fact, it should be simple.

There are three things that really stand out about this recipe. 1) Its easy. 2) It tastes great and 3) it will keep you wired for hours! I’m really shocked at how wired someone can get off just a little raw cacao. I make it a point now to not eat these any later than about three in the afternoon. If not, well, you’ll find it really easy to not fall asleep in the evening. I guess if I was going out, this would be the perfect pre-function snack.

Recipe:

  • 1 cup dried fruit. (In this case Apricots, in previous cases cherries)
  • 8 large medjool dates
  • ¼ cup cacao
  • 2-3 Tablespoons Almond butter
  • ½ cup raw almonds
  • 1 teaspoon vanilla powder
  • 1 teaspoon coconut oil
  • Pinch sea salt

Add the dried fruit to the food processor first and chop until it’s as fine as possible. Apricots tend to break up into little square pieces. Cherries break down further, but the idea is to get it broken down while it’s still mostly dry. Next, add the vanilla powder, salt and Almond butter. Spin the food processor a bit longer. The mixture should break down even more. After it starts to stick together a little, add the dates and coconut oil. It won’t take long after that before you’ve got a big ball of paste.

It might actually feel more like fudge. This batch felt and tasted a bit like the filling in a Fig Newton. It was a bit tacky, yet kind of dry when it was pulled apart. As you can see, I piled it up on a plate and then reused the food processor to break down the raw almonds. You want to break them down into very small pieces, but not as fine as flower.

I didn’t take a picture, but at this point I rolled the ‘fudge’ into little round balls. I like them small. If they are too big, everyone wants to bite them in half and then crumbs fall all over the place. If they are small, it’s just one bite and no mess!

Note that the almond crumbs are for rolling the balls in. It makes them easy to pick up for the oil in the mixture will get on your figures, but not if there is a coating of something to block it.

This recipe makes a couple dozen (as you can see in the picture).

I love the fact that I can take a half hour and make a plate full of snacks for the week. I’ll probably take 4 or 5 a day everyday for lunch until they’re gone. I couldn’t tell you the count of calories, but I get the feeling that it’s not too bad. The cacao in it makes for a great pick-me-up after lunch. I can see myself making a lot more of these in the coming months. The only really tricky ingredient is the almond butter. Yet, I figure I’ve got ½ a jar left so I can make a couple more batches!

You are what you eat! – Thus, I must be a little nutty! 

See you soon.