Strawberry Kiwi – the tart tango!

If you like ‘em tart, this is a great combo! It’s kind of like green apples in a way, it’s got a kick to it. It’s something that should be tried, but it’s not something that you’d want to consume every day. Yet, I bet things would be different if I had a kiwi vine of my own and harvested vine ripe fruit and then combined it with sun ripened strawberries from the garden. I’ll bet it would be a completely different experience.

The beauty of this one can’t be matched.

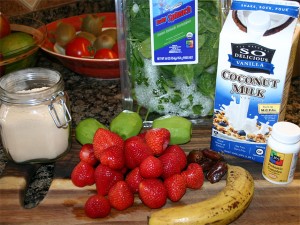
What to mix up:

  • Couple cups strawberries
  • Three pealed kiwi
  • 4-8 little dates (more the better)
  • ½ lb fresh young baby spinach
  • ¾ cup coconut milk (vanilla flavored)
  • 1 little probiotic for good measure.

I love the color contrast between the kiwi and the strawberries. I couldn’t bring myself to add the banana to this one.

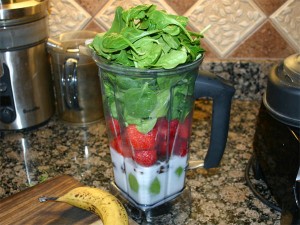
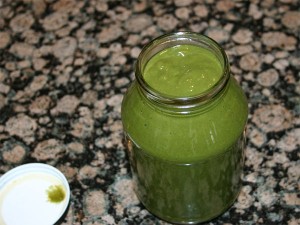
Note that I really had to pack that spinach in! It’s also fun watching this one mix. It starts out green and quickly turns pink from the strawberries. Then, as you press the spinach down into the blades it starts to pick up the signature green that we’ve all come to love:

Spinach is wonderful. I wish it were a little cheaper.

See ya next time.

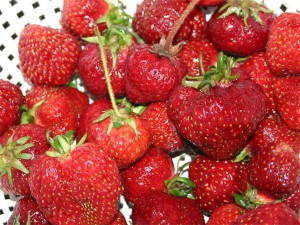
How to find ripe Strawberries

My wife thought that I was crazy taking a picture of ripe strawberries! She asked “What do you think you’re doing?” and I replied that I was going to make a short note for my blog regarding how to tell if you’ve found ripe strawberries. She laughed, “Everyone knows how to pick out fresh strawberries – you smell them.” I said, “See, that’s why I’m going to make this post.”

You might ask, what qualifies me to know how to pick out a ripe strawberry? Well, it was the open invitation that I had regarding eating all the strawberries that I wanted on a U-pick strawberry farm when I was 18 and 19. You see, when you spend the entire day eating strawberries – and if you don’t pick the ripest ones, well, let’s simply say that you’re reminded about it when they leave your body! Leave your body raw, that is. Ouch. It’s not a pretty site.

Needless to say I asked the farmer and learned how to pick ripe berries every time. And the exiting problem no longer existed yet my desire to consume berries continued.

Most people think that you know when a strawberry is ripe if you smell it. Well, that’s just not the case. The smell gets stronger as the berries get riper, but it’s hard to tell what the ripe smell really is. The stores can take advantage of this by placing out fragrant strawberries that trick you into thinking they are ripe. Everyone smells their produce, right? I mean, that’s the key when picking melons. But not Strawberries.

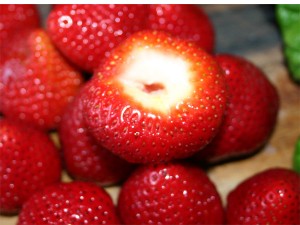
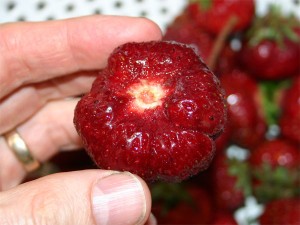
Unripe strawberry:

smells great, but as hard as an apple

There are visual clues that differentiate ripe strawberries from non-ripe ones. The key most important visual is the color under the crown of the berry. The picture above shows a collection of strawberries that I picked up a month or so ago and I’ve cut off the crown.

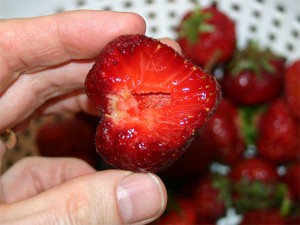
Now, notice how white it is. This is a sure sign that the berry was picked ‘green’. Also, when you cut it in ½ from top to tip – so as to expose the ‘core’ of the berry, that core will be white and hard.

Some ripe strawberries:

no white around the tops

Notice with this collection of berries the fruit just under the crown (flower peddles) are orange-red. This is a really good sign.

crown comes off easily

If you look closer, the removing of the top also gives off subtle clues as to the ripeness of the berry. In this case, the crown twisted off with very little resistance. This is how the plant tells you that the fruit is ready to eat – it’s willing to give up the fruit freely. The top should pull away clean as in the above picture.

The seeds also provide a clue. Ripe berries have red seeds, whereas orange berries indicate that the fruit is not quite ripe yet.

You may notice that there is a little white; it appears that this particular berry could have stayed in the sun one more day.

yum

Now here is that same berry after taking a bite to expose the core. As it turns out, the core ended up on my mouth but it was soft – indicating that the berry was ripe. Also notice the area around the top of the berry that in the previous picture appeared white, well here, we do not see any unripe berry. What we see is the veins that lead to the seeds and what the plant used to nourish the berry.

So, to review:

  • The berries should smell good
  • There should be no white around the top
  • The crowns should come off effortlessly
  • The core should be red – or the berry color
  • Seeds should be red – not orange

One more thing to add; the sweetness of the berry really depends on the amount of sun the plant receives while the berries are ripening. If you’ve every grown berries, you’ve probably noticed that berries that ripen after 3 or 4 days of intense sunlight blow away berries that ripen in the rain! The plant is going to offer up whatever it can and it will do its best with the weather conditions it’s given.

If all else fails, just buy strawberries from your local farmer’s market when they are in season. Plan your shopping day to coincide with the picking that happens after a few really nice sunny days.

Happy pickin’!

All moments can be visited from the present

The act of being only exists in this current moment of time. Every second of every day the present moment continues to exist just like the previous moment but the experiences change. At the root of it, all is energy that flows through you to create emotional attachments to your experiences. These emotional attachments get confused as being who we are, but in reality they are what we’ve experienced.

It’s a shame when I hear people stay statements like “I am this way because…”, or “If you’d been through that I’ve been through you’d …” because the person is attaching their identity to the emotional experience and resonating it into the present. It would be like being forced to listen to a performance of a singer that open-heartedly sang and performed so far out of tune that the energies of the experience strikes you so hard that the awkwardness of the event is forever carried forward tainting every future concert you ever attend.

The present moment is built upon the choices you make in this instant. The basis from which you make your choices come from the emotional attachments that you resonate with. It is important to understand that these emotional experiences are not forced upon you, but rather experiences you resonate with. Because they are not inherently you, you can actively change your resonance to something that is a little more agreeable with the experiences you would like to feel.

I was impressed with this information in my morning meditation – Time travel is possible at any moment in time. The energy that existed before can be revisited by re-experiencing that emotional attachment. The feeling that were experienced before, can once again be experienced in the present – for the action of experiencing the energies only happens in the present.

If you make a conscious effort to recall the emotional experience you will mostly likely find that the physical responses that you experienced before happen again. It’s as if the body is reliving the same experience a second time – regardless of the physical environment and moment in time in which the event originally happened. This is because the body experiences thoughts and emotions as if they only exist in the present. We only exist in the present. There is not past, just what we choose to emotionally resonate forward.

If you clear you mind by consciously not placing energy into previous emotional attachments, you will once again be able to experience the present moment for what it is – unencumbered by previous responses like the standard dichotomies; good/bad, right/wrong, etc. The current moment is what it is and the energies that are present in this moment are available for you to craft new and more beautiful emotional resonances to carry forward.

Future moments can also be brought into the present moment. Just like you resonate with previous experiences, you can start resonating to your future experiences beforehand. The beauty with this process is that you get to take the energy that is available with you (always) in the present moment and consciously shape it to create a resonance pattern for you to ‘vibrate’ too. A vibration to build upon – a new way forward, so to speak.

If you think about the process a little, it’s very similar to how you resonate to previous emotional experiences. The more energy that flowed through the old experience, the stronger the physical reactions and the clearer the emotional resonance that is carried forward. To bring the future into the present, the same thing happens in reverse. You consciously imagine the situation with your mind (linear processing) where you pick out all the main details. Then, you give into the emotional experience of it (parallel processing) where you experience the desire as if you where living it. You make that self crafted desire something that you can emotionally resonate with.

Ultimately, the resonance patterns require energy to relive them. Likewise, to build a forward looking resonance pattern you have to consciously place effort into your desire. Yet, in the end, the resonance patterns are energy flows that you consciously maintain in the present that create attractions and repulsions in your environment – like the wonderful singer or the hideously awful one!

Make your resonance patterns conscious. Give energy to what you want and you will feel the way you want to feel rather than feeling the way you are.

So, what does this all mean?  My interpretation is that the moment someone meets you (me, anyone) the energies that are exchanged are pure and unintentional. As time progresses and you get to learn someone, you get to figure out what they resonate too. You may find that here’s harmony or discord, but the sensation is there. Thus, if you want to change the current moment and be someone different (than you have been) there’s nothing stopping you. Find a different energy stream to feed and pick up a new resonance.

Sound easy? It’s a matter of just doing it.

Blueberry Coconut Sorbet

Looks like blueberry treats are the in thing for me this week.  Lol.  I wonder if I’ll start turning blue like the bad girl in the movie Willy Wonka and the Chocolate Factory? As it turns out, I drank a little too much carrot juice last spring and noticed that my skin started to pick up the color of carrots. I think I’d rather turn blue.

This Blueberry Sorbet is to die for! When I served this to my daughter a couple days ago, her first words where “Oh my God” as the semi-frozen cream melted in her mouth. She couldn’t get over how fresh it tasted. It’s definitely decadent.

I’ve been making this for a while and it freezes great. If you make too much (which I try to always do) you just pour it into a Tupperware container (or Glad or whatever) and place it in the freezer. Make sure you freeze it in single serving sizes because it doesn’t serve up like ice cream.

So here we go. I will assure you that it’s definitely worth your time here.

The Young Thai Coconut water ice cubes make this!

The list of ingredients is really simple:

  • 6 Young Thai Coconut water ice cubes
  • ½ – ¾ cup coconut milk (vanilla flavor)
  • Frozen blueberries
  • Raw Agave

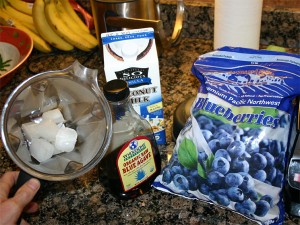
Ok, this one will take a little creative writing for I don’t normally measure how much I use of everything when I whip this up. Thus the next picture may help.

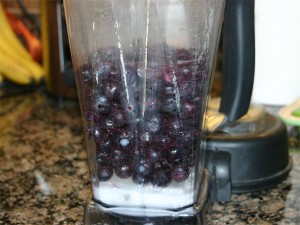
4 cups berries, 3/4 up coconut milk (I think), 6 ice cubes and agave

Looks like I put in about four cups frozen berries. Because they are hard and cold, they will blend down a bit. I think the finished amount was about 3 cups. With the agave, you put in as much as you would like – for me, it’s a squirt about 2 seconds log. I would guess about 2 tablespoons worth.

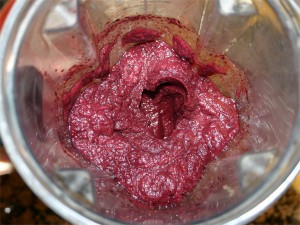
When blending, start slow and work your way up (speed wise). You’ll definitely have to work this one. The berries will not want to drop into the blades so you’ll have to coax them. I end up turning the blender on and off a number of times as I work this mixture with the Vita-mix supplied plunger.

But the end result is definitely worth it!

Just Amazing!

The real trick with this one is the young Thai Coconut milk (water) that you freeze into ice cubes. The recipe is definitely not the same if you pass on this process. Thus, the next time you make Coconut Cream Pie, save the extra water in ice cube trays knowing that it won’t be long before you’ll be making this amazing sorbet! Also note that the Coconut Cream Pie posting has information about opening coconuts that you might want to review if you haven’t opened them before.

I have to admit that the best part about making this recipe is that it’s really fast. You don’t have to soak anything or thaw anything, you just drop it all in and blend it up.

This frozen blueberry roll that I’ve been on makes me think that I’ve got to get to the store and buy some more fresh fruit! It’s cherry season and I shouldn’t be spending my time with frozen stuff. The fresh stuff only (really) comes around for a short time every year. I’ve got to take advantage of it.

Try this and let me know what you think.

Blueberry Bliss Cheesecake

I’m excited because not only am I going to be able to show you a beautiful desert, but I’m going to be able to point you to the complete recipe!

This is one of the first raw deserts I learned to make. It’s wonderfully simple and seems to deliver amazing results every time. I’ve served it at Thanksgiving and eaten it for lunch many a times! Yum.

So here it is – Blueberry Bliss!
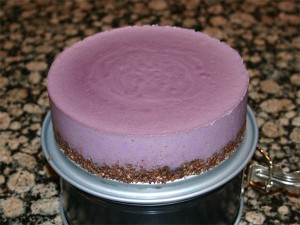
Look at that! Right out of the spring-form!

If that’s too much, here’s a little serving.
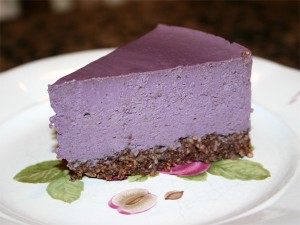
It’s amazing how the close-up shows all the details. I worked for at least a minute jiggling and dropping this spring-form just after pouring the berry mixture in and I still didn’t get all the bubbles out.

When making this desert, the one thing that I’d recommend more than anything else is to make sure you use the best cashews that you can find. Don’t get anything that’s old. Get whole nuts (beans) as fresh as can be.

Also, I use frozen berries (See my Oh My God – Blueberry Sorbet for a picture of the brand). But, when you use frozen berries, they thaw down to at least ½ size. Thus, I pour 4 cups berries into a measuring cup and place them in the dehydrator until they’ve warmed up to 100 degrees. Thus, with the recipe, I’m using a few more berries then what Carmella uses.

Also note that I also place the cacao butter/coconut mixture in the dehydrator to melt along with the berries.

Without further ado, the best write-up is from the source. The Sunny Raw Kitchen’s Bliss-full Blueberry Cheesecake.

Well, what did you think of her desert?  The blueberries over the top just seem … a little over the top. Thus, you don’t see that in my picture.

I also changed the crust a little simplifying it.

What the heck, I’ve changed it quite a bit. I guess I should include my measurements for comparison.

Crust:

  • ¾ cup soaked almonds
  • ¼ cup coconut flakes
  • 1 tablespoon cacao
  • 1 teaspoon vanilla powder
  • Pinch Celtic Sea Salt
  • 2 Medjhool dates
  • Little squeeze Raw Agave

I guess I don’t really like brazil nuts and I’ve found that I like the coconut flakes a little better than the powdered stuff. I put it all together like she does – using a food processor. With the almonds I soak them for maybe 6-8 hours and then let them dry. You want to work with dry nuts

Filling:

  • 4 cups frozen blueberries
  • 1 cup dry cashews – the best you can find
  • 5 Tbsp melted coconut butter
  • 2 Tbsp melted cacao butter
  • ¼ cup honey
  • 1 Tbsp lemon juice
  • Big pinch of Celtic Sea Salt.

Now, the real trick is getting it creamy without overdoing it. So, I approach the process just a little different than she does. I place the nuts in the blender and give them a whirl. It only takes 20 seconds (or so) before the nuts stick together and let the blade run free. At this point, I add everything else. The juice from the melted blueberries soaks down into the nuts softening them a little while you’re piling everything else on top.

Then, when you actually blend this up, let it run a little longer than you would normally do for smoothies. Remember that you started with warm ingredients, but you don’t want to cook them. Thus, feel the side of the blender as it’s getting creamy and make sure it’s not too hot.

Before pouring it into the spring-form, taste it. You should find yourself licking your fingers!

After you’ve poured the berry mixture into the pan, tap the pan so as to encourage the air bubbles to come to the surface. This might take a little extra coxing, so don’t by distracted by that little bit of mixture that you want to keep tasting!

When it cools, the butter and nuts will set-up giving it that standard cheesecake feel. I normally let it sit overnight.

It’s absolutely a keeper recipe. I make it for lunches!

Enjoy.