Why ORMUS as fertilizer?

I’ve had a couple questions about this, so I must not have outlined my thinking regarding ORMUS (Orbitally Rearranged Monatomic elements (ORMUS was derived from ORMES)) as fertilizer clear enough in my previous posting ORMUS as Fertilizer. It may just be a theory, but if it holds up, there should be some clearly measurable results when it’s used.

The idea is this – because molecules that use minerals require angstrom size (single atom) minerals, creating an environment rich in angstrom size minerals would enable the plants to work more efficiently. Likewise, if the soil is rich in angstrom size magnesium atoms, the plant should be able to create more chlorophyll molecules that will allow it to capture more sunlight (energy) that will enable it to produce more. The extra utilization of sunlight should produce sweeter and healthier plants. Ultimately, in the end, the production should be larger.

At least, that’s the basic idea.

In order to understand this better, all you need to do is look at what’s in our seawater. Or, in my case, look at what there is in Dead Sea salt. The back of the Bokek Dead Sea Salt bag reads

The composition of the brines is distinct, comprised mainly of magnesium, potassium and calcium chlorides, as well as a high level of bromides, …

And what we see from the previous posting, it’s nearly 33% Magnesium Chloride and 24% Potassium Chloride. Better yet, let’s look up the Dead Sea and see what Wikipedia states:

The mineral content of the Dead Sea is very different from that of ocean water. The exact composition of the Dead Sea water varies mainly with season, depth and temperature. In the early 1980s, the concentration of ionic species (in g/kg) of Dead Sea surface water was Cl (181.4), Br (4.2), SO42− (0.4), HCO3 (0.2), Ca2+ (14.1), Na+ (32.5), K+ (6.2) and Mg2+ (35.2). The total salinity was 276 g/kg.[10] These results show that the composition of the salt, as anhydrous chlorides on a weight percentage basis, was calcium chloride (CaCl2) 14.4%, potassium chloride (KCl) 4.4%, magnesium chloride (MgCl2) 50.8% and sodium chloride (common salt, NaCl) 30.4%. In comparison, the salt in the water of most oceans and seas is approximately 97% sodium chloride. The concentration of sulfate ions (SO42−) is very low, and the concentration of bromide ions (Br) is the highest of all waters on Earth.

If you follow the links for Calcium Chloride, Potassium Chloride and Magnesium Chloride, you’ll find that the molecules are water soluble. But it’s not just these minerals that are water soluble. It turns out that just about every other mineral ends up in sea water in trace amounts. Here is a link to 80 Elements dicovered in Sea Water (sic) on curezone.com. These minerals are most likely also in their ionic state – a single angstrom size atom suspended in water.

Now, where do these angstrom size atoms go when the H20 is evaporated off the top? Well, they form ‘salts’. As seen above, they are versions of chloride. But that is for the minerals that have extra electrons to share. Calcium has two, potassium has one and magnesium has two. But the beauty is that when added to water the extra hydrogen and oxygen atoms allow the dry chlorides to separate into individual minerals.

Now here is where water works to our advantage. Water molecules are ‘V’ shaped giving each molecule a slight positive and negative charge; like a little magnet. The chloride salts are formed through the sharing of electrons to create stable molecules (when dry) that when added to water split leaving charged atoms floating around in solution. In other words, the water holds the single atom of magnesium in solution because the magnesium has a charge – it’s attracted to the little magnets. What we want to do is bond that atom with something that is not harmful to the plant and also remove the chloride.  

This is where the process of making ORMUS precipitate comes in. To make this precipitate, you add highly mineralized salts to water, which breaks the chloride-mineral bond and then add sodium hydroxide. Sodium hydroxide also dissolves in water creating a surplus of hydrogen atoms. When this happens, the hydrogen atoms have an affinity to combine with the minerals floating in solution. When they do, it stabilizes the ionic charge of the molecule and it can no longer be held in solution. The stable mineral Magnesium Hydroxide precipitates out of solution (as do the other minerals).

After the hydroxides settle out, you’re left with a really salty solution compromised mainly of sodium, chloride and water (you can see precipitate in the picture on one of my previous posts). At this point, you rinse the water off while being careful to keep the precipitate.

In the end, you’ve removed the chloride that you don’t want to give (in high concentrations) to the plants. Yet you keep mineral combinations that are highly absorbable and required by the plants for life.

After all this, you might ask – why go through all this trouble when you can just add standard fertilizer to your garden? The reason is that you want to add a balance of minerals in a form that can quickly be used – without side effects. When you add mined sources of minerals that have strong mineral bonds, the plants have a hard time digesting what they need out of the soil. They quite often only need one mineral from a combination and thus the other is left in the soil which has to be dealt with. Some fertilizers will change the pH over time and have to be neutralized with another mineral compound. This should not happen with ORMUS because the amounts are small and the key acid mineral (chloride) is placed on in minimal amounts.

In any case, it should be pretty easy to mix up a batch or two to water the garden with. And, if it works, I’d expect to see changes (or differences) between the fertilized and non-fertilized plants fairly quickly. The first thing I’ll be looking for will be leaf size. I’ll keep everyone posted as spring arrives!

Previous Posts

ORMUS as Fertilizer

ORMUS as Fertilizer

This year’s gardening project is going to include ORMUS. Thus I figured I’d start the experiment in a public forum – here – to outline the steps and document it over this next growing season.

As any ready long timer reader would know, last year’s growing season really wasn’t all that great. I was able to grow greens, but nothing else really took. There were times during the season when I had to pull plants for they weren’t doing all that well (downright bad to deathly). This year, I don’t want to have to pull anything! I’d rather have the plants good and healthy from the start.

On top of that, I want to consume the healthiest plants! Everyone always says, healthy plants taste better. Well, I’d like to be able to tell the difference. I have to say that last year I got some great tasting veggies, but this year I’ll be looking closer at the taste – if I can get the plants to produce better!

That’s where ORMUS comes in. I’ve followed the ORMUS community for quite a while now and seem to have ‘feelings’ regarding how it should be used. Intuitively, I feel the roll of ORMUS is as fertilizer. I’ll probably go into that feeling in more detail in the future, yet my studies have lead me to believe that the best way to consume minerals is in their bio-available form. That is, as part of a molecule.

If you cut out the metaphysical aspects of ORMUS, what’s left is a great collection of simple minerals. If you look closely at this collection of minerals you’ll see two important characteristics: The magnesium and Potassium levels are fairly high (minerals that are essential for converting sunlight into sugar) and the minerals are in a monatomic form – small enough to be absorbed by the plants.

If you think about it for a while, plants have to get their minerals in their individual form in order to use them in molecules. You don’t see chlorophyll molecules with collections of Magnesium at its core, but you see single atoms there. Thus, placing large amounts of single atom minerals in the soil simply seems to make sense.

It also makes sense to unlock the minerals from its crystalline form – salt. The ORMUS community claims that the sodium-chloride structure captures the monatomic atoms and keeps them locked up. It’s only after you dissolve the water and the minerals are in solution that they become available for use. Unfortunately the sodium-chloride mixture is so concentrated you have to be careful about using it. Thus, the precipitation of minerals that happens during the ORMUS making process allows for the flushing of the ‘salt’.

Doing a little research, I’ve found a website called Sea-Crop that has a bit of information regarding using ORMUS as fertilizer. Their fertilizer is built off Pacific seawater and they’ve got some great results documented on the site.

The problem is that it’s fairly expensive. The website shows it at $60 a gallon. If you consider their application directions, they suggest 2 to 4 gallons per acre.

Yet, when you consider the size of my garden, about 600 sqft relative to an acre 43,560 sqft we see that it’s 0.0137 the size of an acre. Thus, if I were to use the ratio for 4 gallons of Sea-Drop fertilizer, I’d be looking at 4*0.0137 which is 0.055 of a gallon of the mixture.

Now, if you consider that there are 256 Tablespoons in a gallon, 256*0.055 gives 14 Tablespoons of concentrate to place on the garden. 14 Tablespoons equates to about 2 cups concentrate. Thus, to get enough concentrate to fertilize one 50 sqft raised bed, I’d need about 2 tablespoons of the concentrate.

That is not very much!

My experience with precipitating minerals from Dead Sea Salt leads me to believe that one cup of salt will yield about ½ cup precipitate. That’s 8 or so tablespoons, which should be enough.

The only unknown in this equation is how concentrated is the Sea-Crop fertilizer? I’ve bought some before and it looks like the typical precipitate that the wet method produces, but looks can be deceiving. At the same time, I would guess that the manufacturing process would remove as much water as possible as cheaply as possible. Yet, it’s not a paste so they aren’t filtering the water out. If I use just straight precipitate, I’ll have to be careful to measure exactly how much so as to make this study reproducible for anyone else.

Now, what about the salt?

To start with, I’m going to visit Saltworks and see if I can pick up a simple bag of Dead Sea Salt. From their website, it shows that the mineral content shows up something like this:

Chemical Composition:

Mineral Formula Content Range
Magnesium Chloride (MgCl2) 33.3 31.0-35.0
Potassium Chloride (KCl) 24.3 20.0-28.0
Sodium Chloride (NaCl) 5.5 3.0-8.0
Calcium Chloride (CaCl2) 0.2 0.1-0.5
Bromide (Br-) 0.5 0.3-0.6
Sulphates (SO4) 0.15 0.05-0.2
Water of Crystallization   36.4 32.0-40.0

This is perfect. I figure that a good start would be 5 lbs for I only need a cup or two of salt.

To go with this, I’ll need some Sodium Hydroxide for raising the pH so the minerals will precipitate. And, as it turns out, I’ve still got plenty of that for it only takes a few teaspoons to precipitate a cup of salt.

If you are not familiar with the process of precipitating minerals from sea water, it’s outlined in a previous article that I posted called ORMUS, Is this the web method?

Now, for the experiment.

I have a collection of raised beds. In the center of the garden where the sunlight is very similar, I’m going to select two beds to use. One will be the control and the other will be the ORMUS bed. In each bed, I’m going to partition it into a bunch of sections. I’m thinking peas, beans, lettuce, spinach, parsley and tomatoes (or whatever else comes to mind as the season starts) in equal portions in each bed. In other words, if I plant 20 pea plants in one bed, I’m going to place 20 in the other. The locations where the peas go will be the same relative position in each bed.

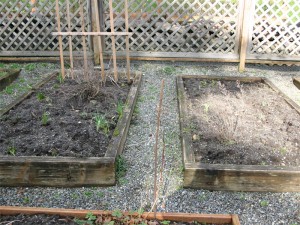
Here are the two beds as they sit this winter.

As the season progresses, I’ll take photographs of the plants in these two beds. At different points of time, I’ll also count the fruit provided by the plants and comment on the size. If I see a difference (or not) I’ll comment on it here.

One of the main reasons for this experiment is because of the trouble that I had growing multiple different items last year. The weather didn’t play out as normal and the plants where definitely stressed. If we end up with another odd year (which it’s playing out that way so far) I’d like to see if ORMUS minerals will have remove the stress that plants experience.

Stay tuned, for I’m pretty sure I’ll have something to comment on over the course of this season.

How to grow wheatgrass

Once again, it’s time to blog about wheatgrass. This winter I’ve found myself in an abundance of grass, so much so that I’ve even made posts on facebook to give it away! I love having extra flats around for the grass is so vibrant. When it comes to harvesting, it’s now a simple 10 minute process. It probably takes more time to ‘synchronize’ with the juice than it does to make it and cleanup.

If you haven’t ever had a sip of this stuff, you don’t know that it moves you so deep that it will make your whole body quiver. I guess the closest feeling is a shot of pure tequila, but there is no burning sensation. So, each time I press an ounce or so to drink, I pick up the shot and let my body harmonize with the juice before I down it. During that time, while I’m holding it, I’ll notice my body preparing. I might get the sniffles, saliva might start to flow or my stomach might growl or turn (in a good way) so I’ve learned that this is a process by which my body synchronizes with this powerful substance.

I’ve you’ve experienced the quiver that you get after taking a shot of wheatgrass, you might want to give harmonizing with the juice a chance before downing it next time. I’m sure that if my body can adjust by simply holding it in my hand, you’re can too.

Growing Wheatgrass

It was many years ago that I was first introduced to growing wheatgrass. When I did, I grew it for the seed rather than grass. Today, I like the grass better than the sprouted seeds and the grass is pretty easy to grow.

Through the beauty of YouTube, I’ve found a video by Paydes36 that really does a good job outlining how it’s done. So, rather than trying to type out the process, I’ll just include her videos here.

From Paydes36’s Channel:

Part 1:

Part 2:

I love her casual approach to sowing these seeds. She scoops and dumps the sprouted seed without a second thought or concern. Most people would be a little more careful, but as she demonstrates, it really doesn’t matter. What matters is that you – just do it.

Let’s review her steps through.

Step 1: Use organic wheat

It seems obvious, but to grow wheatgrass you have to get the type of wheat that will grow! So, you have to ask yourself, why did she make this comment? As it turns out, if you were to buy wheat somewhere, you’d probably find it as wheatberries or cracked wheat. The common use for these whole grains is in cooking – thus it doesn’t matter if the seed is alive or not. Well, to grow it, you’ve got to find living seed.

But don’t worry about it too much for any relatively ‘new’ seed will be alive and willing to grow. Most whole grain grocers carry living seeds and it’s pretty easy to test them. To do this, simply buy a small amount and start the growing process by soaking them and getting them to start sprouting. If the majority of them grow, chances are you’ll do fine with those seeds.

If you find yourself growing so much that you’ll being nickeled and dimed at the health food store, try a feed-store. And, look for Hard Red Winter Wheat. That variety seems to hold up pretty well.

Step 2: Soak Wheat

Here she recommends soaking for 12 hours, I’d lean more towards 8. Sensitive seeds tend to drown if soaked too long. You don’t want to start out with a bunch of dead seed.

Now, she breezes over the ‘sprouting’ process that happens in her bowl. She says to keep them covered and rinse them twice a day. This is good advice, but it’s a process where the most damage can be done to the sprouts.

To me, the most important thing to do is to make sure that the seeds never sit in standing water. If they do, they will mold (drown). If just a couple seeds go bad, it changes the entire batch. So, no standing water and shake them off the best you can.

I’ve always used sprouting jars. One mason jar can hold about 1 cup dry seeds (to start) and by the time they are ready to plant, you’ve got a full jar (4 cups that she talks about). With the jars, you have to use screen tops (or sprouting lids) so the air flows and when you rinse, you have to make sure to shake out all the extra water. One note of caution, don’t let the sprouts go too long in the jar for they will fill it tight. So tight in fact that you’ll have to dig them out. The seeds can take a lot of abuse, but that’s just a little too much.

Ok, she stopped counting her steps.

Next Step: Soil, use good compose

I’d have to agree. Use the best that you have and when you’re done with your tray of wheatgrass, recycle what you’ve used. But I wouldn’t necessarily recommend buying the soil. If you have some, use it.

Also, an inch deep is a good recommendation. What she’s showing in the video is not an inch of soil. Don’t skimp.

Oh, and the Azomite powder, not sure if it’s really needed. If it helps keep the mold down, great. But ultimately, the grass is going to feed off its own energy sources for the first 10 days or so of its life so what you add to enhance things might not give you the desired affects.

Next Step: Planting

I love her smile when she mentions it’s time to plant. It’s at this point that the ‘work’ behind growing the grass is done. From this point out, you kind of let time take over (and simply water).

Her advice about not being skimpy is – good advice! You’re taking all this time to grow the wheat, you might as well get a really good finished product.

Also, what she says about buying flats that are ‘shallow’ really are disappointing. You want to get 15 ounces juice from your tray, I’ve bought trays that barely product 8. That’s just a downright rip-off.

Next step: Watering

I like her advice of simply taking them outside and hosing them down. But be gentle, for those little seeds will wash away.

Next step: Covering

When I first saw that she used colored ink paper for covering your seeds, I thought that they were the funnies and it made me smile. Upon closer inspection, it simply looks like ads.

But if you’re not into giving your grass ads to read while it’s in its first couple days of growing, consider a brown grocery bag or paper towels. The plastic cover is a good idea.

Next step: Growing under paper

When she says cool dark place she really means dark place where the seeds won’t get roasted. It you place them in a really cool place, it’s going to take forever for them to start growing. If it’s warm, they’ll virtually jump out of their seeds.

Her summary:

When she says it take seven days from planting to harvesting, she means that it probably takes 10 days from soaking to harvesting. She makes this clear when she says ‘here’s planting’ as she holds up the tray of seeds that she just covered with plastic and ‘here’s harvesting’ as she places the tall wheatgrass tray on top for demonstration.

By the way, her demonstration tray looks absolutely beautiful! Don’t expect your trays to look this nice until you’ve practiced for a while. And, like she says, you don’t want to grow your grass too long. You want to catch it while it’s still converting carbohydrates (stored energy in the seed) into simple sugars. Thus, the grass will taste sweet rather than bitter. You simply won’t be able to drink much bitter juice!

Oh, harvesting – use scissors. Knives just don’t ‘cut it’.

In conclusion:

If growing wheatgrass isn’t in the cards for you, if you ask around a bit in your community, you should be able to find someone that already grows it. If you do, I’d expect that you’d find it offered for under 1 dollar an ounce. In other words, if a tray produces 15 ounces juice, you should find it for no more than 15 bucks. If you’re buying larger amounts, you should be able to find it for 8 to 10 a flat.

For me, I’ve been blessed with a source – my father! My abundance this year is directly correlated to my dad’s industrious behavior. Earlier this year, he said that he was going to grow twice as much as last year. Well, last year I felt I got a great amount. This year, the trays are piling up! At this rate, I’m going to have to teach more people about the power of wheatgrass so they’ll want to come over when I offer up ‘free shots’.

So, if you’re going to grow wheatgrass, you’ll probably find that it’s easier than you think and when it comes to juicing, you’ll find that the taste will probably be superior to what you buy at a place like Jumba Juice.

Amazing ‘Tomato Cradle’ in action

It’s been a while since the Amazing Tomato Cradle post and I figured it was time for an update. So, here we are in the first part of August and I’ve got new pictures to show.

If you remember from the first posting, the tomato plants were guided up and through the fencing with the idea that the fence would hold the plant and all its fruit off the ground. Well, so far so good.

All leg
no fruit. ZZ-top would be happy!

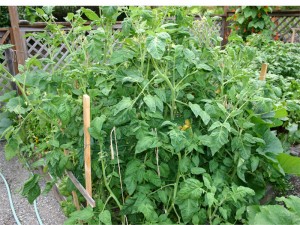
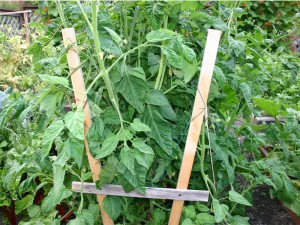
These two pictures are from the same angles as the previous pictures. As you can see, the plants have filled out the cradle a bit. These particular plants must be six feet tall. Which, I believe is a bit much for a tomato plant.

The worst part about it is that the plants haven’t produced any fruit. It’s sad in a way, but I guess I’ll be keeping the slugs from eating the plants rather than the fruit.

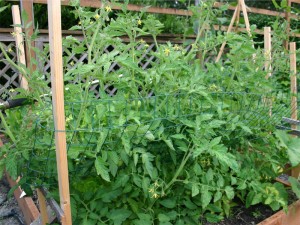
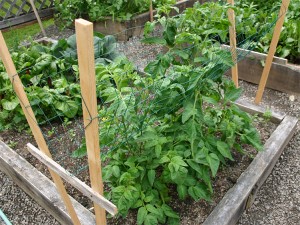
Fortunately, not all the tomato plants in the garden are all leg. Here are some that are a bit more ‘normal’ and they actually show fruit.

Fruit is forming

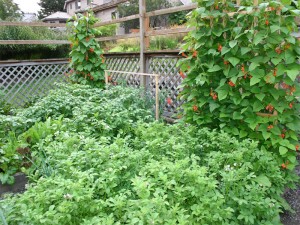
Each morning when I visit the garden to pick my basket of greens (you know, all those green smoothies that I make) I get distracted by the chip and buzz of the local humming bird. He (she) loves working the poll beans that are now in full bloom.

So far, just humming bird food.

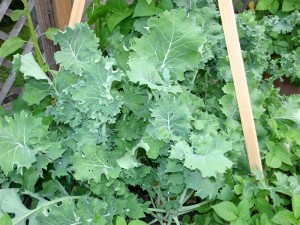
I’m looking forward to kale chips.

Can't wait to tap into this.

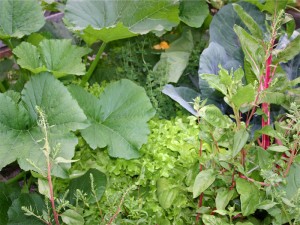
And, the other day in Portland, I got to try some Zucchini hummus. That stuff was actually pretty good. With the thirteen zucchini plants that I have in the garden this year, I’m sure I’m going to get more than enough to try making my own hummus.

This lettuce is my favorate

Just got a call from my dad, he asked if I’d sampled any of the potatoes from the garden yet. I have, but just the ones that grew wild in the compost. They were pretty tasty. And, as you can see there are going to be a lot more from the garden. I’m looking forward to digging them up come the end of September.

Can’t wait to plant some fall spinach. I’m going to give that cold frame another good try in about a week. Hopefully, we’ll get just enough warm whether to set another good crop. I’d love some fall spinach.

Take care!

The Amazing ‘Tomato Cradle’!

Every year when my enthusiasm in spring for gardening is high, I have high hopes for my tomato plants and always go hog-wild putting them in. As summer rolls around, and play time arrives, that early spring plant-fest always ends up a slug-fest. Well, this year I’ve put a little extra effort into making sure this doesn’t happen!

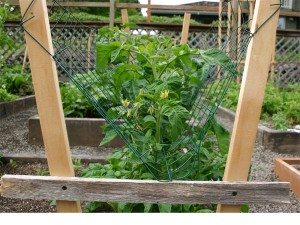
This year I’d like to introduce you to my ‘tomato cradle’! Not wanting to have to tie up plants and not wanting them to fall to the ground, I opened my mind so as to accept a reasonable solution and this is what came to mind:

The 'Tomato Cradle' introduction

Does that come through for you like it does for me? You might want to click on the picture for a bigger view. Here’s the end view:

Side angle tomoato support

As you can see, I have raised beds in which I garden. These beds are five feet by ten feet. To me, that is the perfect size box.

If you look closer at the top picture, you’ll see that I’ve screwed in 1/2×3/4 slat wood supports in a slight ‘V’ shape. These supports come 8 feet long. I cut them in ½. At about 15-18 inches, I placed the cross support. This was at the height of the plants when I first put them in the ground.

The green wire is 4 foot high fencing with the biggest spacing that I could find. I believe it’s a 2×4 inch hole. I cut the fencing just long enough to span from support to support and before sliding it down on the supports, I folded the fencing in ½ (as the lower picture clearly shows).

After sliding the fencing down into place, I threaded the tops of the tomatoes through the fencing.

Since these were put up a few weeks ago, I’ve been watching to make sure I get all the main growth sprouts through the fencing. I want everything to grow on top of the fence. I’m expecting that as the plants grow, they will bloom and get heavy with fruit, but rather then fall to the ground, they will fall into the fencing.

The main idea is to support the fruit off the ground so as to make it really hard for a slug to get at it. The other key idea is to keep me from having to constantly tie up the plants! I just want to set the timer for watering and go play.

I’ll take some follow up pictures as the plants come into fruit to show how this new method is holding up. Also, if I come across issues, I’ll make sure to point those problems out.

Speaking of issues, I had absolutely no luck starting tomatoes from seed this spring. None! Last fall/early winter I wanted to get a start on spring and I dug up plans for making a cold frame off the net. I figured it shouldn’t be too hard (if I was lucky). I picked up a window off craigslist and other supplies at the local Home Depot. Then, I invited my dad over for his creative expertise.

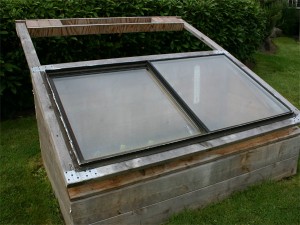
After more than a few hours, this is that rolled out of the garage:

not so cheap Cold Frame

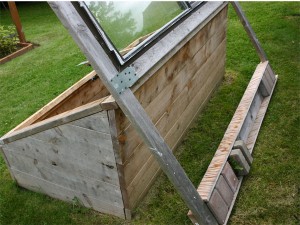
I have to say that I really like the counter-balance idea that my dad came up with. When you lift on the front of the ‘door’, it’s only a few pounds heavy. Notice the bricks that I’ve used for the counter balance weight. Turns out they work great.

Counter balance in action

I’ve got a couple extra bricks stored just behind the box out of sight so that when I need to have the door hang open, I just place them on the support and the door stands straight up. If you’re going to make a cold frame, I highly recommend a counter balance!

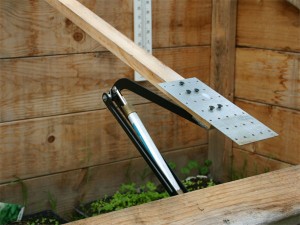
With a cold frame, one of the most important problems is heat. You want some, but not too much. I figured with my schedule, I’d fry everything – that is, if I didn’t get help. As my luck would have it, harbor Freight carried (carries) green house window lifters. They look like this:

Coolest gas piston!

These are totally cool! They are gas pistons that work on thermal energy. When the box heats up, the gas expands which pushes on the piston which lifts the window, which lets the heat out. As the air cools, the gas contracts the piston reverses and the window lowers. The pistons can lift up to fifteen pounds, but with the counter balance top, it’s not lifting that much. I have to admit that I get a sense of satisfaction when I see the window open a foot or so on a hot day.

At this point, I highly recommend this type of setup.

In a few weeks, after my current collection of starts make their way into the garden, I’m going to move the entire cold frame into the garden. I’ve cleared out a spot that’s just big enough that’s right next to the hose. One of the biggest problems that I had this spring was not keeping the starts moist enough. Next year I will not be hauling water. Thus I’ll have no excuse.

Another idea that my dad mentioned is to compost under the seedlings so that the compost heat adds to the solar heat to help even out the early spring temperature. Thus, when I move it into the garden, I’m going to make sure to dig a pit below the bottom of the box that I can fill with early spring compost.

One of the other problems that I noticed is that I’ve built the box sides so high that hey block a lot of the sun. Thus, that compost that I place within the box, next year, will raise the seedlings up so they get more light. That should be a good thing, we all know that everything needs light to survive!

Note that nearly every pea and bean that I started in the garden didn’t come up. Nearly every pea and bean I started in the cold frame is now climbing a pole, flowering and developing a pod. I’d totally call it a success and I still have to plant another flat of beets, two flats basil and one flat collard greens.

Can’t wait for ripe tomatoes!