Beet Melody – the early summer smoothie

Baby beets are finally in season again and the Saturday market always has the best selection. One of my favorite vendors there is Full Circle Farm.

Don't panic - It's organic!

I’ve thought about signing up for their fresh produce delivery program, but it seems that I’m always in town on Saturday morning, so I just take 15 minutes and stop in. And this time, as it turns out, they had four different types of beets in their selection. I grabbed two bunches with the heaviest collection of greens with the idea that the first most valuable part would be my blended breakfast.

Thus, the Beet Melody Smoothie!

Here’s what I started with:
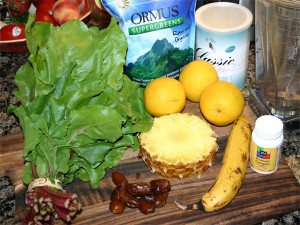
Beautiful beet tops

As you can see, this smoothie is a bit on the tropical side, for the fruit in abundance in this house happens to be oranges and pineapple. Which, I have no problem with.

If you want to reproduce this, you’ll need:

  • A few seedless oranges (I used three)
  • About an inch of pineapple
  • One banana
  • Seven or Eight little Deglet Noor dates
  • And, of course, beet tops.
  • (optional spoonful ORMUS Supergreens, Reliv Classic and Probiotic)

As you can see in the picture, I’ve already trimmed the beets. Turned out they made a beet-carrot salad last night. The beets were red on the outside and white on the inside. By sight, you’d probably mistaken them as radishes.

In any case, wash these greens! Anything that sits next to the ground is bound to have a little extra dirt in it. I use a water bath to really get it out.
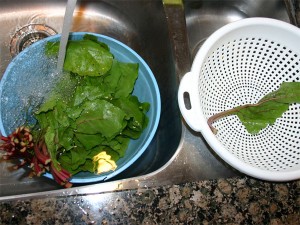
Easy rinsing process

After shaking the greens in the water and carefully rinsing them off, they stack up in the strainer on the right. Afterwards, this is what you’re left with:

Leave the dirt behind!

No worries. We all process a lot of dirt in our lifetimes, a little more shouldn’t hurt. But I really like my minerals in the more bio available form – plant form.

After trimming the outer part of the pineapple, pealing the oranges (and picking out the seeds) and pealing the banana, everything stacks up like this:
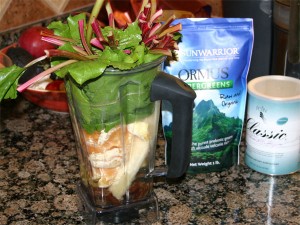
This is what you'd normally have to chew up!

When I start blending something this full, I always start out slowly. I use the tamper to move the larger pieces down and get the mixture to start moving. As soon as it does, I remove the tamper, place the clear cap on top of the vita-mix and work it up to full on.

As with most smoothies, I start counting and cleaning. After about 60 seconds most the mess is cleaned up and the smoothie is ready to pure. These are always so easy!
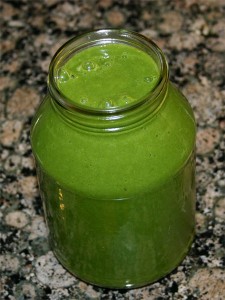
And the results

Remember that the Queen of green smoothies says that to really change your life you’ll want to consume at least 1 quart (1 liter) of green smoothie every day on an empty stomach. All my recipes make between 5 and 6 cups. You’ll probably also notice that there are a few hundred calories in these smoothies. That’s actually a good thing! Fill up on healthy stuff rather than cheeseburgers.

Let me know what you think of this one. Beet greens are better for you than the roots and they’re easy to prepare.

Enjoy!

The Amazing ‘Tomato Cradle’!

Every year when my enthusiasm in spring for gardening is high, I have high hopes for my tomato plants and always go hog-wild putting them in. As summer rolls around, and play time arrives, that early spring plant-fest always ends up a slug-fest. Well, this year I’ve put a little extra effort into making sure this doesn’t happen!

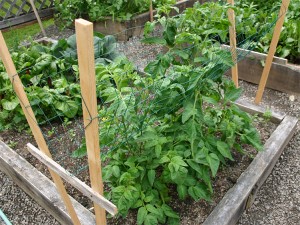
This year I’d like to introduce you to my ‘tomato cradle’! Not wanting to have to tie up plants and not wanting them to fall to the ground, I opened my mind so as to accept a reasonable solution and this is what came to mind:

The 'Tomato Cradle' introduction

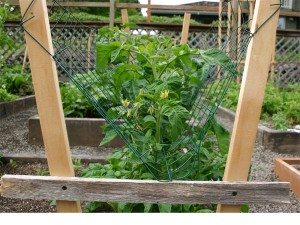
Does that come through for you like it does for me? You might want to click on the picture for a bigger view. Here’s the end view:

Side angle tomoato support

As you can see, I have raised beds in which I garden. These beds are five feet by ten feet. To me, that is the perfect size box.

If you look closer at the top picture, you’ll see that I’ve screwed in 1/2×3/4 slat wood supports in a slight ‘V’ shape. These supports come 8 feet long. I cut them in ½. At about 15-18 inches, I placed the cross support. This was at the height of the plants when I first put them in the ground.

The green wire is 4 foot high fencing with the biggest spacing that I could find. I believe it’s a 2×4 inch hole. I cut the fencing just long enough to span from support to support and before sliding it down on the supports, I folded the fencing in ½ (as the lower picture clearly shows).

After sliding the fencing down into place, I threaded the tops of the tomatoes through the fencing.

Since these were put up a few weeks ago, I’ve been watching to make sure I get all the main growth sprouts through the fencing. I want everything to grow on top of the fence. I’m expecting that as the plants grow, they will bloom and get heavy with fruit, but rather then fall to the ground, they will fall into the fencing.

The main idea is to support the fruit off the ground so as to make it really hard for a slug to get at it. The other key idea is to keep me from having to constantly tie up the plants! I just want to set the timer for watering and go play.

I’ll take some follow up pictures as the plants come into fruit to show how this new method is holding up. Also, if I come across issues, I’ll make sure to point those problems out.

Speaking of issues, I had absolutely no luck starting tomatoes from seed this spring. None! Last fall/early winter I wanted to get a start on spring and I dug up plans for making a cold frame off the net. I figured it shouldn’t be too hard (if I was lucky). I picked up a window off craigslist and other supplies at the local Home Depot. Then, I invited my dad over for his creative expertise.

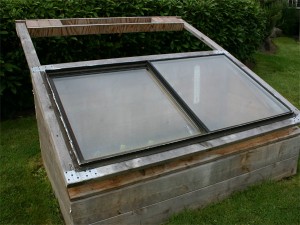
After more than a few hours, this is that rolled out of the garage:

not so cheap Cold Frame

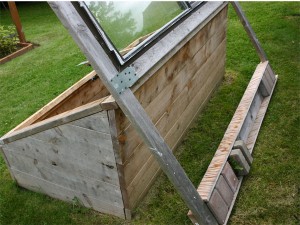
I have to say that I really like the counter-balance idea that my dad came up with. When you lift on the front of the ‘door’, it’s only a few pounds heavy. Notice the bricks that I’ve used for the counter balance weight. Turns out they work great.

Counter balance in action

I’ve got a couple extra bricks stored just behind the box out of sight so that when I need to have the door hang open, I just place them on the support and the door stands straight up. If you’re going to make a cold frame, I highly recommend a counter balance!

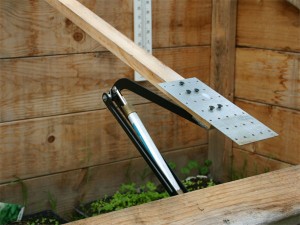
With a cold frame, one of the most important problems is heat. You want some, but not too much. I figured with my schedule, I’d fry everything – that is, if I didn’t get help. As my luck would have it, harbor Freight carried (carries) green house window lifters. They look like this:

Coolest gas piston!

These are totally cool! They are gas pistons that work on thermal energy. When the box heats up, the gas expands which pushes on the piston which lifts the window, which lets the heat out. As the air cools, the gas contracts the piston reverses and the window lowers. The pistons can lift up to fifteen pounds, but with the counter balance top, it’s not lifting that much. I have to admit that I get a sense of satisfaction when I see the window open a foot or so on a hot day.

At this point, I highly recommend this type of setup.

In a few weeks, after my current collection of starts make their way into the garden, I’m going to move the entire cold frame into the garden. I’ve cleared out a spot that’s just big enough that’s right next to the hose. One of the biggest problems that I had this spring was not keeping the starts moist enough. Next year I will not be hauling water. Thus I’ll have no excuse.

Another idea that my dad mentioned is to compost under the seedlings so that the compost heat adds to the solar heat to help even out the early spring temperature. Thus, when I move it into the garden, I’m going to make sure to dig a pit below the bottom of the box that I can fill with early spring compost.

One of the other problems that I noticed is that I’ve built the box sides so high that hey block a lot of the sun. Thus, that compost that I place within the box, next year, will raise the seedlings up so they get more light. That should be a good thing, we all know that everything needs light to survive!

Note that nearly every pea and bean that I started in the garden didn’t come up. Nearly every pea and bean I started in the cold frame is now climbing a pole, flowering and developing a pod. I’d totally call it a success and I still have to plant another flat of beets, two flats basil and one flat collard greens.

Can’t wait for ripe tomatoes!

Time to update my Yoga goals

Today must be yoga day. As I have a few extra minutes on the PC, I can’t seem to turn my focus away from yoga sites. It’s amazing what Google can find, but it’s even better when you find a good site to poke around on. In this case, I found a posting about the guy below on the Rawalicious’s blog. The article is David Swenson coming to LA March 19-21st!

I have to say that this guys is totally inspiring. My first thought was – here’s another old guy doing yoga – but as I watched, it became clear that he’s mastered the art of it and his youthfulness shines through. It gives me hope. Maybe if I stick to it like glue I’ll feel like it looks like he feels (hopefully that makes sense to you). 


I absolutely love the jump (57 seconds in) from down-dog to handstand. I’m going to put that on my list of goals right after being able to do a simple handstand. lol. And then the transition from handstand to the splits (1:29 seconds in), dang, that’s a smooth move. I don’t’ think I’ve ever seen a guy do the splits before. I guess it can be done. And then again the move from down dog to sitting (2:39 seconds in), that is something that I’d like to be able to do. I’ll add that to the list.

Here is another performance that’s a little more formal.

Ok, to add to my list:

  • Smooth transition to handstand. After I’ve gotten into handstand for more than a few seconds.
  • Smooth transition from down dog to sitting. I can see being able to do that within a year.

Regarding my previous goals (see Dave’s Yoga Goals), I have to say that I’m making progress. I can now pull one leg around for Half Lotus pose and it’s no longer painful. The handstand I can hold without breathing – for a second or two. The Ujjayi breathing is coming a little easier. And, finally, the emotional resistance is nowhere near as strong.

I’ve got plenty of time.

Shake it down with the Ross Sisters

Holly Smokes!

Ha. Found another one of those YouTube videos that I just can’t help but post. Saw this one on a financial blog about a year ago. Well, it’s come back into my life and, well, it’s worth the 4 minutes.

If you want more, Google up “Ross Sisters Yoga” it will bring back nearly 4 million hits!

Enjoy.